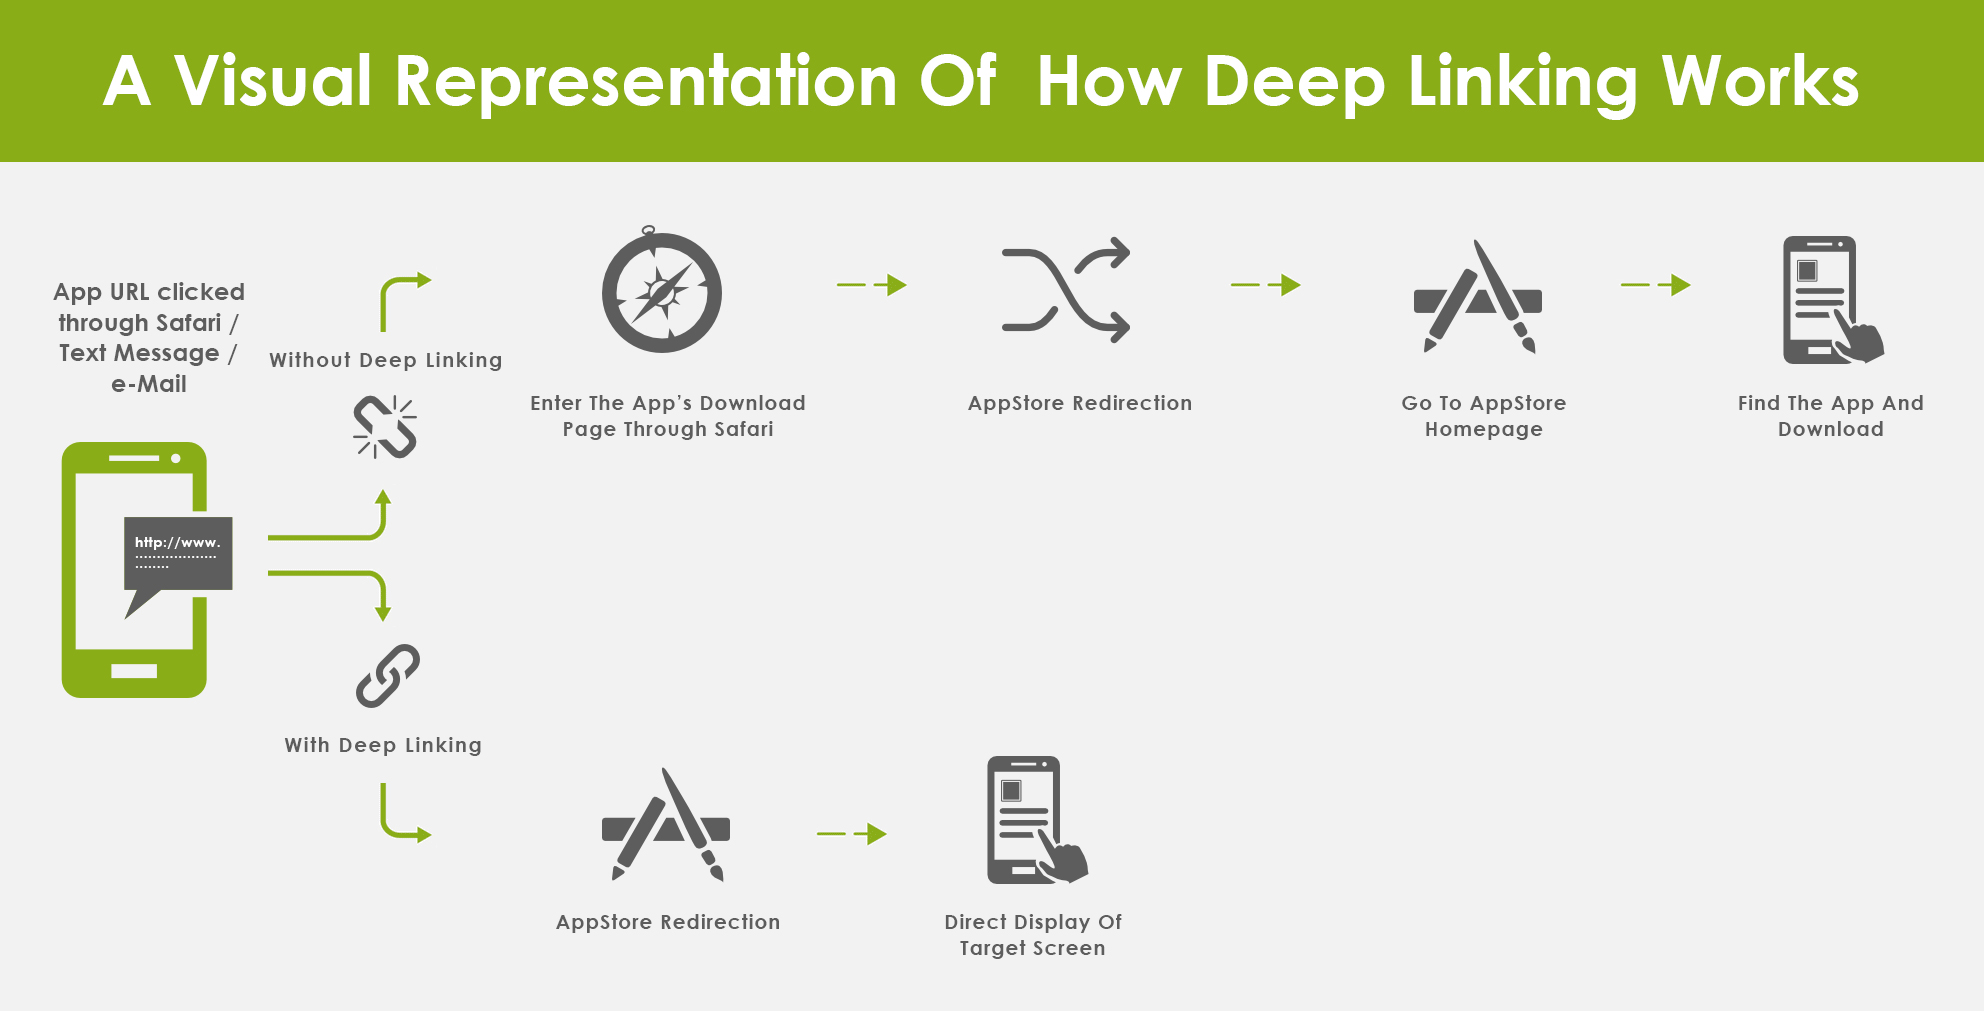
What is deep linking ?
With deep linking, developers can set up apps so that they contextually redirect a user to a precise location in another app. This is done through the enveloping of a Uniform Resource Identifier (URI) that marries a very specific location address, formatted similar to:
Syntax : urlscheme://pathExample : googleMap://routes/source/*
The idea is to encapsulate vital information in a calculated and intentional way to allow external applications (or even Web pages) to open up another native app and present the specific location within the app that the URI refers to. This contextual solution provides a way around the closed ecosystem in platforms like iOS, as well as greater cross-application integration.
 Simple Notes:
The communication from one native iOS application to another, or from a web page to a application.
Create an app and enable deep linking
Let's take the example of Google Maps for creating a deep link.
Create a basic app in XCode consisting of a main ViewController pushed on a UINavigation ViewController. Also create some additional ViewControllers to be used later.
To enable deep linking, go to the Info tab in the Xcode project. In the URL Types section, click on the ‘+’ button, and then add an identifier and a URL scheme. Ensure that the identifier and URL scheme you select are unique. Take note of the URL scheme you enter, as this is how iOS knows to open a link in your app. The sample app registers the following url scheme:
googleMap
To confirm that your URL scheme has been registered, check Info.plist for an entry named ‘URL Types’. Expanding it will show you the new URL scheme you just registered. You can check that this is working by typing the following URL into Safari Mobile: your-url-scheme:// ( For the sample app, it would be: googleMap://). This should open up your app. If not, please go through this section again before moving on.
Handling the opening of registered urls within your app
Now that you’ve ensured that deep linking is working, we need to handle the URL used to launch the app. In it’s current state, your app can be launched using a simple URL, but it can’t do much beyond that. To do more, we need to override the following function in AppDelegate:
-(BOOL)application:(UIApplication *)application

      openURL:(NSURL *)url

      sourceApplication:(NSString *)sourceApplication

   annotation:(id)annotation
Note that this is not present by default, and needs to be added. This function gets called every time your app is launched using the registered URL-scheme. The arguments are:
- URL: The complete URL used to launch the app.
- SourceApplication: The bundle ID for the application from which the URL was called.
- Annotation: A property list object that can be used to pass additional info along with the URL.
The format of the URL is as follows:[scheme]://[host]/[path]
Breaking this down, we get:
- Scheme: The URL scheme tells iOS which app to launch. Note that the URL scheme should be registered with the device for it to be able to handle this (this is what we did in the previous section).
- Host: The host is analogous to a website/server name on the web. You can handle multiple hosts within your app.
- Path: The path enables you to provide additional information regarding the location within your app.
In general, you would use the host and path parameters to determine what the user intends to do.
The exact contents of this method largely depend on your needs, but for the purpose of this post, we will check the host and then based on the path, load a particular ViewController.
-(BOOL)application:(UIApplication *)application openURL:(NSURL *)url sourceApplication

(NSString*)sourceApplication annotation:(id)annotation{

      if([[url host] isEqualToString:@"page"]){

        if([[url path] isEqualToString:@"/page1"]){

          [self.mainController pushViewController: [[Page1ViewController alloc] init] animated:YES];
        }

      return YES;

}
Line 2 checks to see if the host within the URL is what we are expecting, i.e. ‘page’ in this case. After that, it matches the URL path and loads the view controller for that page. In this way, you can handle every expected URL within the function and show a different screen for each.
One thing to note is that the app can be launched with a URL regardless of whether this function can handle it or not. In such cases returning NO from the method tells iOS that the URL was not handled by the app. The result in general, is that the app just opens in the last state it was in.
Two cases:
When you click on the deep-linked URL, there are two possible scenarios with regards to the app in question:
i)When the app is installed. ii)When the app is not uninstalled.
Note : For iOS 8 there is no universal link concept and the universal links are available only from iOS 9.
In case of iOS 8, if the app is
Installed: If you click on the link in the browser and the app registered with the URL scheme is installed, you will be taken to that application. (Hooray! Congratulations!)
Uninstalled: This will show an ‘Invalid Address’ pop-up.
Hint (Backend Tips): In the backend, they have to follow this pattern for URLs: [scheme]://[host]/[path]. The timer function which will wait for a few milliseconds and then trigger to the desired URL. Certain deep links will take you to the App Store, for installing the application.
In case of iOS 9,
Universal links are very snappy, and ‘Invalid Address’ pop-ups will not appear.
In XCode under ‘Capabilities’:
We should configure our application to register the approved domain. For this, we do the following:
- Enable the "Associated Domain" feature for the bundle identifier "com.yourdomain.myProject" in our Apple account .
- Enable "Associated Domain" under the ‘Capabilities’ tab.
- Next, we add the domain entitlement as follows:
In the domain section, we add the appropriate domain tag. You must prefix it with “applinks:”. In this case, that would be “applinks:yourdomain.com”.
Ex : “applinks:testDomain.com”.
Lastly, if, for some reason, XCode 7 fails to include the entitlements file in the build, make sure that your new entitlements file in the project browser is selected for membership to the right targets, so that it’s built.
The best option to use is the "Apple app site association file" which is recommended by Apple for universal links.
Apple app site association file creation and other things have to be done by the backend.
Procedures for backend to configure deep links:
Universal Links turn your website URL into an app link, so you need be running a web server in order to leverage them.
Pick a domain
First, identify the domain that you’d like to use for your UniversalLinks. You can register a new one or use an existing one. If registering a new one, use a clean, non-spammy registrar like ghandi.net.
Acquire SSL certification
You need to acquire SSL certification files for the domain you’ll use to host the Universal Links. In order to do this, you’ll need to use a third party service to register your domain for SSL, and create the files you need. After looking around, we’ve chosen Digicert to handle branch.io and associated subdomains.
Here are the steps to create your SSL certification:
- Visit https://www.digicert.com/easy-csr/openssl.htm and fill out the form at the top to generate an openSSL command. Keep this window open.
- Login to your remote server.
- Execute the openSSL command to generate a certificate signing request (.csr) and certification file (.cert)
- Pay for your SSL certification at https://www.digicert.com/welcome/ssl-plus.htm
- Wait for Digicert to approve and send you the final files.
- In the end, move yourdomain.com.cert, yourdomain.com.key and digicertintermediate.cert into the same directory on your remote server.
Create your Apple-app-site-association JSON
There is a pretty standard structure of this JSON file, so you can basically just copy this version and edit it to fit your needs. I’ll breakdown where to get the correct values below.
{

   "applinks": {

      "apps": [ ],

      "details": [

        {

            "appID": "T5TQ36Q2SQ.com.branch.sdk.TestBed",

            "paths": [ "*" ]

        }

      ]

}
The only fields you need to change are associated with: “T5TQ36Q2SQ.com.branch.sdk.TestBed”. This is actually two values joined together with a period. Both values are found on developer.apple.com in the Identifiers -> App IDs section. Just click on the corresponding registered App ID as shown below.
In this example, connect the Prefix and the ID together with a period so that it looks like so:“T5TQ36Q2SQ.com.branch.sdk.TestBed”.
Save this JSON file as apple-app-site-association-unsigned.
Sign the JSON file with your SSL certificates
Upload the apple-app-site-association-unsigned file to your server into the same directory as the certification and key files from the previous steps. Using the command line, change directory into that folder and issue the following command:
cat apple-app-site-association-unsigned | openssl smime -sign -inkey yourdomain.com.key -signer
yourdomain.com.cert -certfile digicertintermediate.cert -noattr -nodetach -outform DER > apple-app-site-
association
This will generate the file apple-app-site-association
Configure your file server
Alright! So you have your signed apple-app-site-association file. Now you just need to configure your file server to host this for you. There are a few caveats:- It must be sent with the header ‘application/pkcs7-mime’
- It must be sent from the endpoint com/apple-app-site-association
- It must return a 200 http code.
We set up the one for all Branch integrated apps using our Node+Express link servers. Here’s the code we used in case that’s helpful:
var aasa = fs.readFileSync(__dirname + '/static/apple-app-site-association');

app.get('/apple-app-site-association', function(req, res, next) {

   res.set('Content-Type', 'application/pkcs7-mime');

   res.status(200).send(aasa);

});
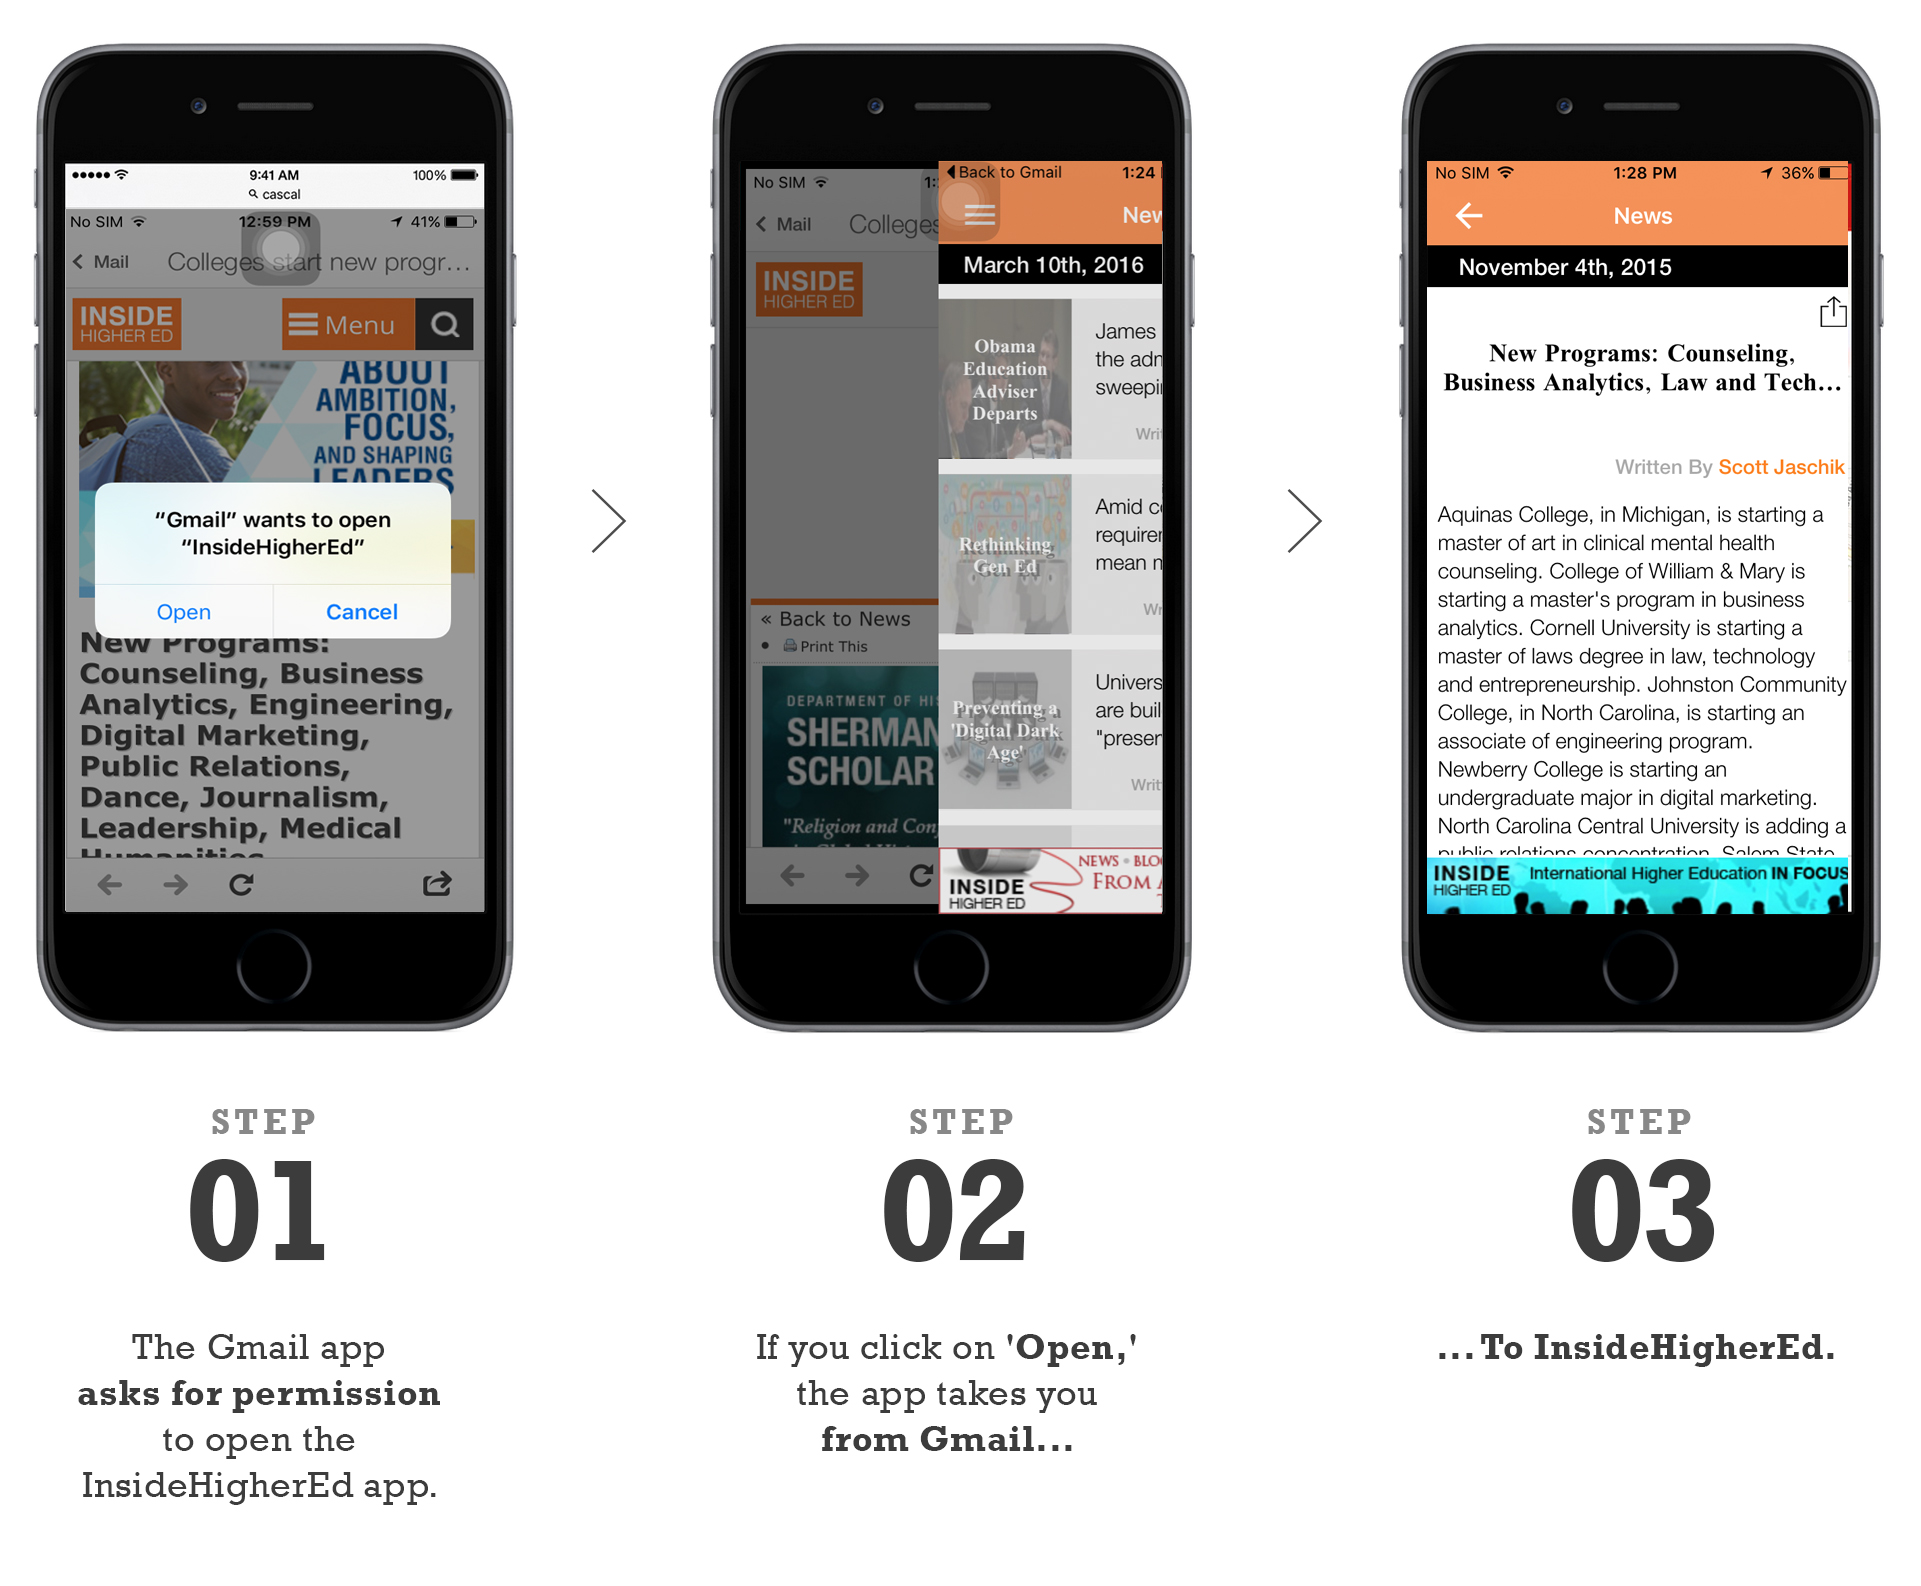
Here's an example of what happens when you deep link, with screen shots. The user is viewing his mail, and clicks on a link that will lead to InsideHigherEd, an education news portal.

And voila! You now know how to deep link. Cheers!

